
1. Lay the design side up on your lap or on a flat surface and work across the width of the rug and always start in the center of the backing. When placing the backing on your lap put the backing on the right knee and hold right hand on knee in the writing position. (Left-handed place left hand on knee)
2. Hold the backing firmly with the left hand one half inch from working area. (Left handed hold backing with right hand) This provides a frame using your lap. If the rug is large enough you can tuck the right side under your thigh.
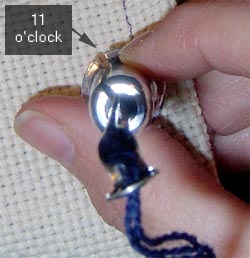
3. Begin in the center of the rug and start punching away from yourself. The open channel of the punch should always be open in the 11 O’clock position. (Left handed should set the open channel at the 1 O’clock position going away from your body.
4. Poke the punch needle through the backing straight down until it hits the hub or the handle.
5. Whenever starting to poke you must anchor your first stitch. Most do not understand that this means only in the first poke and the last poke.
ANCHORING IS ACHIEVED BY POKING INTO THE FIRST HOLE THEN INTO THE SECOND HOLE THEN BACK INTO THE FIRST HOLE. SOMETIMES ANCHORING CAN BE ACHIEVED BY POKING INTO THE FIRST HOLE THEN INTO A HOLE ALREADY POKED. THIS CAN ONLY BE DONE WHEN THE TWO HOLES POKED ARE THE SAME COLORS.
6. Remember to change direction of the open channel when anchoring. It is 11 O’clock going away from the body and 7 O’clock coming towards your body. (Left handed will be 1 O’clock away and 5 O’clock towards). When moving sideways us the 9 O’clock to the left and 3 O’clock to the right.
7. Punch row by row initially. This will allow you to get comfortable with the movement and have an ease cutting each loop. If you are doing a large section of background poke from one side to the other.
8. When comfortable poking try to poke more than one row at a time making sure the hand under the rug guides the previous poked loops away from the new loops.
Punching for the first time
1. Practice first.
2. Locate an area with a large section of background.
3. Begin and end with an anchor stitch. Punch one hole, punch back a hole, punch forward into the first (double punch). Double punch at the end of the row.
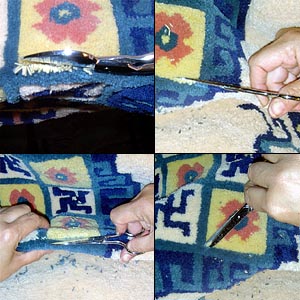
4. After punching one row you will collect the loops with a knit needle. Gently pull the loops up, then remove needle and clip.
IMPORTANT TIPS
The back of your rug is the side with the printed design on. This is the side you will be working on.
If you do not anchor your first and last stitch it will not hold tight. Each hole must have at least 6 strands of wool. One loop constitutes 6 strands because the wool is 3 ply.